

Have you ever seen those beautiful textured designs that look like tiny loops of yarn or thread? That’s punch needle embroidery! It’s a craft that uses a special tool called a punch needle to push thread or yarn through fabric, creating loops that form designs. Punch needle is a form of embroidery related to rug hooking that dates back hundreds or possibly thousands of years.
When you do punch needle, you use a hollow needle to push yarn through woven fabric. The magic happens as you pull the needle back out – it leaves behind a perfect loop! You can create all kinds of designs from simple patterns to intricate pictures. Many crafters love punch needle because it works up quickly compared to other needle arts.
You might be surprised at how easy it is to get started with punch needle embroidery. All you need is a punch needle tool, some fabric (often called foundation cloth), a hoop to keep your fabric tight, and yarn or thread. The technique is simple enough for beginners but versatile enough to keep experienced crafters interested too. Your finished projects can become wall hangings, pillows, rugs, or even clothing decorations!
If you want step-by-step help, see how to do punch needle.
History and Origins of Punch Needle
Punch needle crafting has a rich history that spans centuries, with roots in both early textile production and modern crafting movements. This technique has evolved from simple beginnings to become a popular hobby today.
Ancient Beginnings
Punch needle has intriguing historical roots, though its exact origins are debated. Some experts trace the technique back to ancient Egypt, where early forms of needle punching may have been used to create textiles. Early punch needle work likely used simple tools to push thread or yarn through fabric.
During the 19th century in Britain, as the Industrial Revolution began, punch needle techniques started to take more recognizable forms. However, it was in North America where punch needle truly developed into a distinct craft.
In the late 1800s, punch needle rug hooking emerged in America. This technique evolved from traditional rug hooking practices and became popular for creating household textiles.
Modern Revival
The punch needle tool as you might recognize it today has more recent origins. In 1995, the Oxford Punch Needle was invented by someone who wanted a more comfortable and easier-to-use tool. This innovation helped make the craft more accessible.
Today’s renewed interest in punch needle comes from a broader revival of traditional handcrafts. You can now find many styles of punch needle tools, from traditional wooden handles to modern ergonomic designs.
Social media has played a huge role in punch needle’s recent popularity. Platforms like Instagram and YouTube have helped spread techniques and inspire new crafters to try punch needle for themselves.
Many modern punch needle artists blend traditional techniques with contemporary designs, creating everything from wall hangings to pillows and rugs.
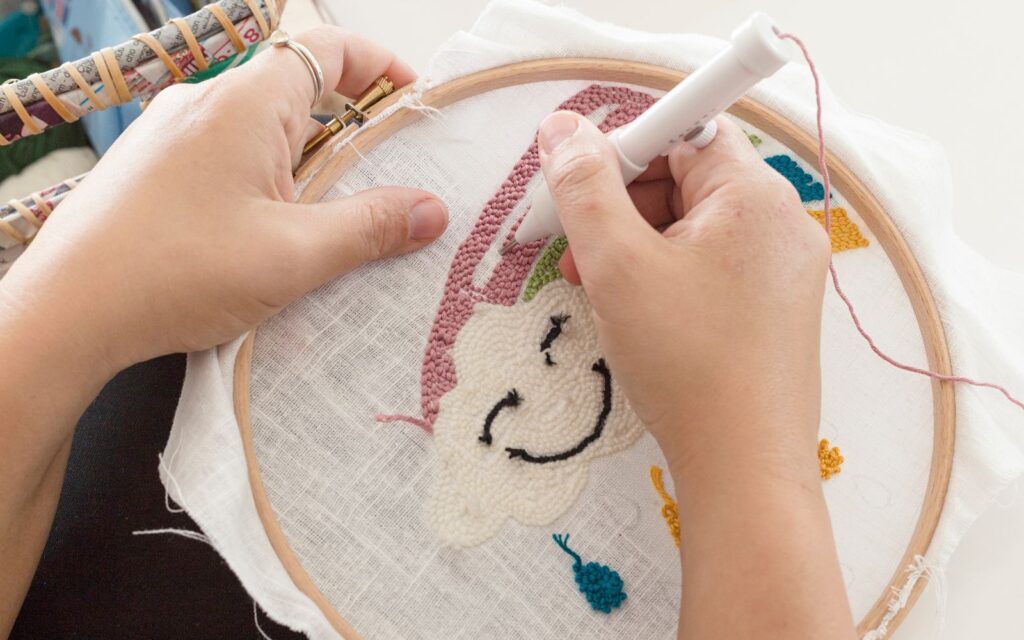
Understanding Punch Needle Embroidery
Punch needle embroidery is a fascinating craft that creates beautiful textured designs through a unique looping technique. It’s an accessible art form that has been around for centuries but is enjoying renewed popularity among crafters today.
Defining the Craft
Punch needle embroidery is a fiber art technique where you use a special tool called a punch needle to create loops of thread or yarn through a woven foundation fabric. The needle pushes thread through the fabric, forming small loops on the opposite side. As you continue punching, these loops pack together tightly, creating a secure and textured surface.
Unlike other needle crafts, punch needle doesn’t require complex stitches. You simply punch down and pull up in a continuous motion. The magic happens when the loops of thread compress against each other, holding everything in place without knots.
The finished piece can look like a small rug or tapestry with a soft, plush texture that’s satisfying to both create and touch.
Punch Needle vs Traditional Embroidery
While both are needle arts, punch needle differs significantly from traditional embroidery in technique and appearance. In traditional embroidery, you work from the front of your fabric, pulling the needle completely through with each stitch. You create different stitch patterns that lie flat on the fabric surface.
With punch needle, you work from the back of your fabric, and the needle never comes completely through. The result is a three-dimensional texture with loops on one side and a smooth, needlepoint-like appearance on the other.
Traditional embroidery typically requires learning many different stitches, while punch needle uses just one basic technique. This makes punch needle especially beginner-friendly—you can create impressive designs much faster than with traditional embroidery.
Materials and Tools
Getting started with punch needle requires gathering the right supplies. These tools will set you up for success and help you create beautiful punch needle projects with ease.
Choosing the Right Needle
Punch needles come in different sizes and styles to create various effects in your work. The size of your needle determines the thickness of your loops. Larger needles work with chunky yarn, while smaller ones are perfect for fine embroidery floss.
Look for needles with comfortable handles since you’ll be gripping them for extended periods. Adjustable punch needles are great for beginners because you can change the loop length as you experiment with different techniques.
Popular brands include Oxford, Ultra Punch, and Amy Oxford needles. Many starter kits include a basic punch needle to help you begin without feeling overwhelmed by choices.
Remember to keep your needle threaded correctly! Thread should flow smoothly through the hollow center and out the tip.
Selecting Fabrics
The foundation of your punch needle project is the fabric. Monks cloth and weavers cloth are the most popular choices because their loose weave allows the needle to pass through easily while holding the yarn loops securely.
When shopping for fabric, look for:
- Even weave with visible holes
- Tightly woven but not too dense
- Natural fibers like cotton or linen blends
- Strong enough to withstand repeated needle punching
Primitive linen works well for larger projects, while evenweave fabrics like Aida cloth suit detailed designs with embroidery floss. Avoid stretchy fabrics as they won’t hold your loops properly.
Pre-hemmed fabric can save you time and prevent fraying around the edges of your work.
Yarn and Embroidery Floss
Your choice of fiber dramatically impacts your finished project’s texture and appearance. For chunky, plush projects, wool yarn creates beautiful, full loops. Acrylic yarn is more affordable but may not hold its shape as well.
For detailed work with smaller needles, embroidery floss gives precise results. DMC embroidery floss comes in hundreds of colors, making it perfect for intricate designs.
When selecting your fibers, consider:
- The size of your punch needle
- The desired effect (plush vs. flat)
- Color combinations for your design
- Yarn weight and texture
Don’t be afraid to mix different types of yarn in one project for interesting textural effects! Store your yarn collection in clear containers to easily see what’s available.
The Role of the Embroidery Hoop
An embroidery hoop is essential for keeping your fabric tight while working. Without proper tension, your loops may pull out or become inconsistent.
Look for:
- Wooden hoops in 8-10 inch sizes for beginners
- Hoops with strong closures that maintain tension
- Adjustable hoops for different project sizes
For larger projects, consider a no-slip morgan hoop or a gripper frame. These specialized tools hold your fabric extra tight during the punching process.
Always keep your fabric drum-tight in the hoop to prevent puckering and ensure your loops stay in place. Reposition your hoop as needed when working on larger designs, making sure to overlap worked areas.
Getting Started with Punch Needle
Starting punch needle is easy and fun! With just a few basic materials and some simple steps, you’ll be creating beautiful textured designs in no time.
Setting Up Your Workspace
First, find a comfortable, well-lit area where you can work. A table or desk at a height that won’t strain your back is ideal. You’ll need:
- Punch needle tool
- Embroidery hoop (6-8 inches works well for beginners)
- Monk’s cloth, linen, or other loose-weave fabric
- Embroidery thread or yarn (depending on your needle size)
- Scissors
- A pattern (optional for beginners)
Stretch your fabric tightly in the embroidery hoop. The fabric must be drum-tight – this is super important! If it’s loose, your stitches will pull out easily and you’ll get frustrated.
Make sure your pattern is transferred to the fabric if you’re using one. You can draw directly on the fabric with a washable marker or use transfer paper.
Threading the Needle
Choose the right thread for your needle size. Larger needles work with yarn, while smaller ones use embroidery floss.
- Thread your needle from the pointy end to the handle end.
- Pull the thread through until about 1-2 inches extends from the tip.
- Adjust the length setting on your needle if it has one. This controls how long your loops will be.
Don’t pull too much thread through at once – about an arm’s length is perfect to prevent tangling. Keep your thread supply nearby for easy access when you need more.
Starting Your First Stitch
Hold your punch needle like a pencil, with the beveled side (the slanted opening) facing the direction you’re moving. This is important for creating neat stitches!
Position your hoop so the fabric is facing up. You’ll work from the front, but the loops form on the back side.
Insert the needle straight down into the fabric until the handle touches the surface. Pull it back up about 1/8 inch away, keeping the needle tip just below the fabric surface as you move.
Continue this punch-and-slide motion, following your pattern or creating freeform designs. Work in one direction, keeping your stitches close together for a full, even look.
Remember, it’s normal for beginners to have some loose stitches. Just keep practicing your technique!
Punch Needle Techniques
Mastering punch needle involves learning a few key techniques that will help you create beautiful designs. These techniques focus on making consistent loops, adding texture, and developing good habits for better results.
Basic Stitches and Loops
When you start punch needle embroidery, understanding the basic stitch is essential. The punch needle creates loops by pushing thread through your fabric. As you push the needle down and pull it back up, it forms a loop on the underside of your work.
To make consistent loops, hold your punch needle like a pencil. Keep the needle tip against the fabric while you work. Move in the direction that feels most comfortable—many people work from right to left or away from their body.
Try spacing your stitches evenly, about 1/8 inch apart. If you place them too far apart, your work might have gaps. Too close, and the fabric may pucker. Practice making rows of stitches to get comfortable with the rhythm.
Creating Texture and Dimension
You can create amazing texture in your punch needle projects by varying your loop heights. Adjust the needle depth setting to make longer or shorter loops. Shorter loops create a firmer, more dense area, while longer loops add a plush, soft texture.
Try mixing different yarn or thread weights for interesting effects. Chunky yarn creates bold texture, while thinner threads allow for more detail in your design.
For added dimension, consider these techniques:
- Outline work: Use shorter loops around the edges of shapes
- Pile effect: Make longer loops in the center of shapes
- Direction changes: Vary the direction of your stitches to create visual interest
Experiment with overlapping different colored areas slightly to create blended effects in your design.
Perfecting Your Technique
Developing good habits will help you achieve better results with punch needle embroidery. Keep your fabric drum-tight in your hoop or frame. Loose fabric leads to uneven loops and frustration.
Work with a consistent rhythm and pressure. Don’t pull the needle too far away from the fabric between punches—keep it just above the surface. This helps maintain uniform loop heights.
If you notice your loops falling out, you might be working too close to previous stitches or pulling your needle too far away from the fabric. Check your tension regularly as you work.
Remember to punch straight down into the fabric, not at an angle. Angled punches can create irregular loops. Take breaks when needed—tired hands affect your technique!
Patterns and Designs
Punch needle patterns come in countless styles and difficulty levels to match your creative vision. Finding the right pattern can make your punch needle project both enjoyable and successful.
Reading and Creating Patterns
Punch needle patterns work differently than other embroidery patterns. They typically show you where to place each color and which direction to punch your needle. When reading a pattern, you’ll notice outlines that separate different color areas.
As a beginner, look for patterns labeled “for beginners” which have larger areas of color and simpler shapes. These are easier to follow and complete.
You can create your own patterns too! Start by sketching your design on paper. Keep it simple with clear borders between different colored areas.
Many crafters use grid paper to plan their designs, with each square representing a punch. This helps you visualize how your finished piece will look.
Design Inspiration
Finding inspiration for punch needle projects is easier than you might think. Coloring pages make excellent patterns because they already have clear outlines and simple shapes.
Stained glass patterns work wonderfully for punch needle because they feature distinct sections divided by bold lines. Nature themes like flowers, animals, and landscapes are popular choices.
Consider these sources for design ideas:
- Coloring books and free printable coloring pages
- Vintage illustrations
- Simple line art
- Geometric patterns
- Folk art designs
- Your own drawings
Browse online marketplaces like Etsy for downloadable patterns created by experienced punch needle artists. Many offer free or low-cost patterns perfect for beginners.
Transferring Designs onto Fabric
Once you’ve chosen a pattern, you’ll need to transfer it onto your fabric. The most common fabric for punch needle is monk’s cloth or weavers cloth.
Here are reliable methods for transferring your design:
-
Light box or window method: Place your pattern under your fabric and trace it using a water-soluble marker or pencil.
-
Carbon paper: Position carbon paper between your pattern and fabric, then trace over the lines to transfer them.
-
Iron-on transfer: Some patterns come as iron-on transfers you can apply directly to fabric with heat.
Make sure your fabric is stretched tightly in an embroidery hoop or frame before transferring your design. This prevents distortion and ensures accurate tracing.
Always trace on the side of the fabric that will be facing you while working. Remember that punch needle is worked from the back, so your finished design will appear on the opposite side.
Punch Needle Projects
Punch needle is a versatile craft that lets you create many beautiful and functional items. You can make projects of all sizes, from tiny decorative pieces to larger home accessories.
Home Decor Items
Cushions are one of the most popular punch needle projects. You can create beautiful pillow covers with simple or complex designs to brighten up your living space. The texture of punch needle makes cushions extra cozy and touchable.
Miniature rugs are another fantastic project. Make a small accent rug for beside your bed or create a decorative wall hanging that looks like a tiny rug. These mini rugs show off your punch needle skills and add warmth to any room.
You can also make wall art in embroidery hoops. These make for eye-catching decor that displays your creativity. Try making:
- Seasonal decorations
- Plant pot covers
- Table runners
- Lampshade covers
The loop texture of punch needle creates a unique look that’s different from other fiber arts.
Personal Accessories
Your punch needle skills can create wearable items too! Make patches to sew onto jackets, bags, or jeans for a personalized touch. These sturdy patches hold up well to regular wear.
Jewelry is another fun option. You can punch needle tiny pendants or earrings using smaller hoops and finer threads. These make for lightweight, colorful accessories that stand out.
You might also enjoy making:
- Keychains
- Bookmarks
- Hair accessories
- Phone cases
For beginners, start with a simple design like a small flower or geometric shape on a keychain. As your skills grow, you can create more detailed personal items.
Gift Ideas
Punch needle projects make thoughtful, handmade gifts. Create custom coasters with designs that match the recipient’s home decor or personality. These practical gifts are both beautiful and useful.
Ornaments are perfect for holiday giving. You can make seasonal decorations that will be treasured year after year. Try different shapes and colors for various holidays.
Consider making these punch needle gifts:
- Pet toys (using sturdy backing)
- Bookmarks with personalized designs
- Customized pencil cases
- Small trinket boxes with punch needle lids
The time you put into a handmade punch needle gift shows how much you care. Even simple projects can be meaningful when personalized for someone special.
Finishing and Caring for Your Projects
Once you’ve completed your punch needle project, proper finishing touches and care will ensure it lasts for years to come. The right techniques help protect your hard work and showcase it beautifully.
Trimming and Binding
After finishing your punch needle work, you’ll need to trim any loose threads and secure the edges. Use sharp scissors to carefully trim the yarn ends without cutting your actual loops. For the edges of your project, a whip stitch works wonderfully to prevent unraveling.
You can finish the back by adding a felt backing. This covers the “messy” side and gives your project a professional look. To do this, cut a piece of felt slightly smaller than your project, then whip stitch it around the edges to secure it in place.
If you’re making something like a pillow or wall hanging, binding the edges creates a clean finish. You can use bias tape or fabric strips to cover raw edges and add a decorative touch to your punch needle piece.
Cleaning and Maintenance
Punch needle projects collect dust over time, so regular gentle cleaning keeps them looking fresh. For routine maintenance, a light vacuuming with a brush attachment works well for wall hangings and rugs.
If your project needs deeper cleaning, spot clean with mild soap and cool water. Avoid soaking your work, as this can loosen the loops and damage your design. Dab gently rather than scrub.
For stubborn stains, test any cleaning solution on an inconspicuous corner first. Let your project air dry completely before displaying it again. Never wring or twist punch needle work, as this distorts the loops.
Displaying Finished Work
Your completed punch needle projects deserve to be shown off! Small pieces work beautifully in embroidery hoops for wall display. Simply trim excess fabric and secure the back with hot glue.
For larger wall hangings, attach a dowel rod through a fabric pocket sewn onto the back. This distributes weight evenly and prevents stretching. Adding a sawtooth hanger makes it easy to mount on your wall.
Functional pieces like pillows need extra reinforcement. Consider sewing your punch needle piece onto sturdy fabric before assembling into a pillow. This adds durability to high-touch items.
Rotating your displayed pieces occasionally prevents fading from sunlight. Keep punch needle work away from high-traffic areas where it might get snagged or stepped on. With proper care, your beautiful creations will last for many years!
Advanced Punch Needle Considerations
Once you’ve mastered the basics of punch needle, you can explore more complex techniques to elevate your projects. These advanced approaches help you create more unique and professional-looking pieces while expanding your creative possibilities.
Multilayered Designs
Creating depth in your punch needle work makes it stand out. You can achieve this by working with multiple layers of stitches. Try punching a base layer first, then add details on top with shorter loops or different colors.
For dimensional effects, vary your loop heights intentionally. Longer loops produce a plush, textured appearance while shorter ones create a tighter, flatter finish. This technique works well for creating elements like flowers or animals that pop from the background.
You can also experiment with a technique called “color blending.” This involves using two different colored yarns together in your needle to create a marbled or heathered effect in your design areas.
Using Variegated Yarns
Variegated yarns add interesting color transitions to your punch needle projects without requiring multiple thread changes. These specialty yarns shift between colors as you work, creating unique effects.
When using variegated yarn, consider how the color changes will affect your design. For random patterns, work in sections across your project. For deliberate color placement, you might need to “waste” some yarn to reach the color segment you want.
Try combining variegated yarn with solid colors for striking contrast. You can use the changing colors for backgrounds and solid colors for foreground elements. This creates depth while maintaining design clarity.
Experimenting with Different Fabrics
While weaver’s cloth is the standard foundation for punch needle embroidery, trying different backing fabrics opens new creative doors. Linen offers a natural, textured look but requires careful tension management.
Monk’s cloth works well for larger projects with thicker yarns. Its loose weave accommodates bulkier materials, making it perfect for rug-making or cushion covers. Just be sure your punch needle size matches your chosen fabric’s weave.
You can also try unconventional backgrounds like burlap or even denim for unique effects. Remember that tighter weaves require thinner yarns and smaller needles. Always test a small area of your fabric first to ensure your needle can penetrate consistently without damaging the material.
Connecting with the Punch Needle Community
Joining the punch needle community can enhance your crafting journey tremendously. Other punch needle enthusiasts offer inspiration, troubleshooting help, and can share technique tips that aren’t found in books or videos.
Forums and Social Media
Facebook groups dedicated to punch needle embroidery provide excellent spaces to share your work and ask questions. Look for groups like “Punch Needle Embroidery Enthusiasts” or “Modern Punch Needle Artists” where thousands of crafters exchange ideas daily.
Instagram is a goldmine for punch needle inspiration. Follow hashtags like #punchneedle, #punchneedleembroidery, and #punchneedleart to discover new designs and techniques. Many artists share free patterns or quick tutorials in their stories.
Pinterest offers countless boards dedicated to this craft where you can save project ideas for later. Reddit has smaller but active communities like r/PunchNeedle where you can post your work for feedback.
Workshops and Classes
Local craft stores often host punch needle workshops where you can learn alongside others. These in-person classes give you hands-on guidance that’s invaluable for beginners.
Online platforms like Skillshare and Craftsy offer comprehensive punch needle courses you can take at your own pace. Many include downloadable patterns and material lists to get you started right away.
Check community colleges and art centers in your area for longer-term classes. These typically span several weeks and allow you to develop your skills progressively.
Many professional punch needle artists offer specialized workshops focusing on specific techniques like 3D elements or working with unusual materials.
Exhibitions and Events
Craft fairs and maker markets showcase punch needle work alongside other fiber arts. Attending these events lets you see finished pieces up close and talk directly with artists about their process.
Fiber art exhibitions at galleries or museums can inspire your own practice. Look for shows that feature contemporary textile art, which increasingly includes punch needle embroidery.
Annual events like “Fiber Festival” or “Craft & Stitch Expo” bring together vendors, artists, and enthusiasts. These gatherings often include demonstrations where you can watch experts work their magic with the punch needle.
Join or create a local stitch-and-chat group where you can work on your projects while connecting with others. Many friendships have formed around shared crafting tables!
Resources for Continual Learning
Learning punch needle is a journey that continues long after you master the basics. There are many resources to help you grow your skills and find inspiration for new projects.
Books and Magazines
Several excellent books can guide your punch needle adventure. “Punch Needle” by Arounna Khounnoraj offers beautiful projects and clear instructions for beginners. “Punch Needle Embroidery for Beginners” by Lucy Davidson provides step-by-step guidance with colorful illustrations.
You might also enjoy “Modern Punch Needle” by Melissa Lowry, which focuses on contemporary designs. For regular inspiration, check out specialty craft magazines like “Punch Needle & Primitive Stitcher” that feature new patterns and techniques.
Don’t forget to look for pattern books at your local library! Many libraries now carry craft books that you can borrow before deciding which ones to add to your personal collection.
Online Tutorials and Courses
YouTube is a treasure trove of free punch needle tutorials. Channels dedicated to fiber arts often post detailed videos showing different techniques and project ideas.
Platforms like Skillshare and Udemy offer structured courses taught by experienced punch needle artists. These typically include:
- Detailed video lessons
- Downloadable patterns
- Community support
- Feedback on your work
Instagram is another great resource where you can follow hashtags like #punchneedle or #punchneedleembroidery to see what other crafters are creating. Many artists share mini-tutorials in their posts or stories.
Facebook groups dedicated to punch needle embroidery provide community support and answer questions as you learn new techniques.
Local Craft Stores
Your nearby craft stores are valuable resources for your punch needle journey. Many shops offer workshops where you can learn new techniques in person and meet other punch needle enthusiasts.
Staff at specialty yarn or fabric stores can recommend the best materials for your projects. They often know which fabrics work best with different needle sizes and yarn weights.
Some stores have regular “stitch and chat” gatherings where you can bring your punch needle work and learn from others. These informal settings are perfect for picking up tips and tricks you won’t find in books.
Don’t hesitate to ask if your local store can order special punch needle supplies if they don’t stock what you need. Many are happy to help expand their inventory based on customer interest.