

Punch needle is a fun, beginner-friendly embroidery technique that creates beautiful textured designs. You might have seen these cozy-looking pieces on social media or craft stores and wondered how to get started. Punch needle works by pushing yarn or thread through fabric using a special needle tool, creating loops on one side and a flat texture on the other side.
Wondering what supplies you need? A basic punch needle kit includes the punch needle tool, fabric (usually monk’s cloth), an embroidery hoop to keep your fabric tight, and yarn or embroidery thread. The size of your punch needle determines what thickness of material you’ll use – thicker yarns create chunkier, rug-like textures while thinner threads make more detailed designs.
Getting started with punch needle is much easier than you might think! Unlike traditional embroidery that requires learning various stitches, punch needle mainly involves one repeated motion. You simply push the threaded needle through the fabric and pull it back out, creating loops as you go. You can use punch needle to create wall hangings, pillows, rugs, or even wearable art pieces.
Understanding Punch Needle Embroidery
Punch needle embroidery is a textile art that creates soft, textured designs using a special needle tool. This craft has gained popularity for its simple technique and beautiful results.
History and Evolution
Punch needle embroidery dates back hundreds of years with roots in various cultures. The technique was traditionally used to create rugs and decorative textiles in Russia, the Middle East, and parts of Europe.
In the early 1900s, punch needle became popular in America for creating hooked rugs. The craft went through periods of popularity and decline throughout the 20th century.
Today, punch needle has experienced a major revival in the crafting world. Modern artists have reimagined this traditional technique with contemporary designs and bright colors. Social media has played a huge role in its comeback, with crafters sharing their creations online.
The tools have evolved too. While traditional wooden punch needles are still used, many beginners now start with ergonomic plastic or metal needles that are easier to handle.
Overview of the Technique
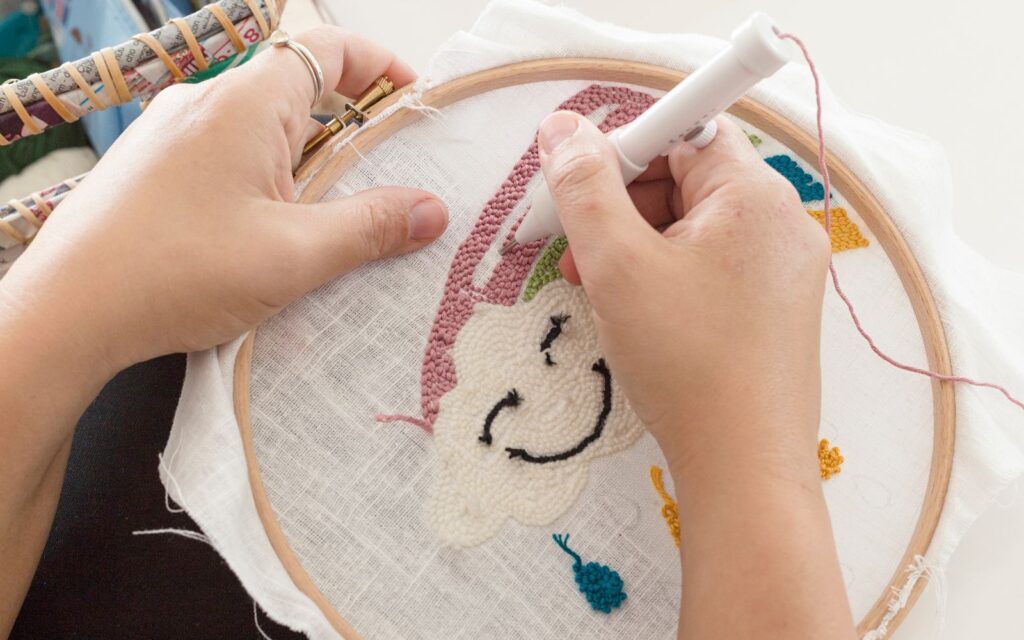
Punch needle works by pushing yarn or embroidery floss through fabric using a hollow needle tool. The magic happens when you push the needle through the fabric and pull it back out, leaving a loop of thread behind.
You work from the back of your project, but the loops form on the front side. This creates a carpet-like texture that’s soft and three-dimensional.
The basic supplies you need include:
- A punch needle tool
- Embroidery floss or yarn
- Woven fabric (monk’s cloth is popular)
- An embroidery hoop to keep fabric tight
The technique is simple to learn but takes practice to master. You’ll hold the needle like a pencil and punch straight down into the fabric. Keep your fabric very tight in the hoop – this is crucial for creating even loops.
Different needle sizes create different effects. Larger needles work with chunky yarns for bold textures, while smaller needles use embroidery floss for detailed designs.
Essential Supplies for Punch Needle
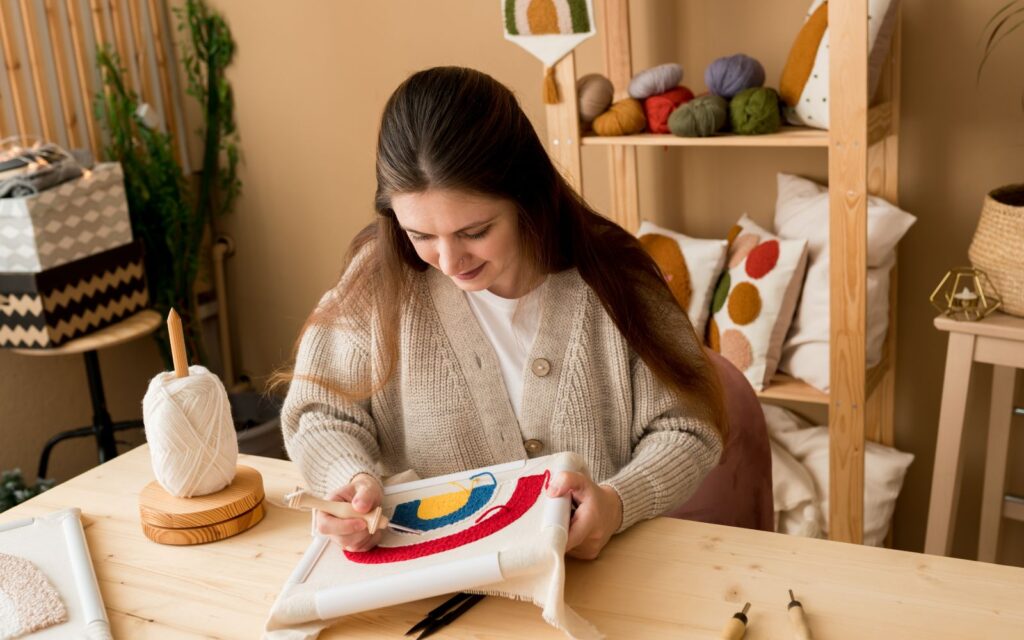
Getting started with punch needle requires a few key supplies before you can create beautiful textured designs. The right tools will make your punching experience smoother and more enjoyable.
Choosing the Right Needle
When starting out, selecting the right punch needle is crucial for your project’s success. Punch needles come in various sizes and styles. The most common type is the ultra punch needle, which works well for beginners.
Needles have different sizes measured by numbers – the smaller the number, the larger the needle. Larger needles create bigger loops and work best with thicker yarns. Smaller needles create finer details and work well with thinner threads like embroidery floss.
Look for needles with comfortable handles since you’ll be gripping them for extended periods. Some needles have adjustable depth settings that let you control how long your loops will be.
Always start with a medium-sized needle if you’re unsure. You can always add more specialized needles to your collection as you advance.
Fabric and Gripper Frames
The right fabric is essential for punch needle success. Weavers cloth is the most popular and recommended fabric for beginners. It’s a cotton/polyester blend with a tight weave that holds your stitches securely.
If you’re comparing options, this guide to the best fabric for needle punch can help you choose the right one.
Monk’s cloth is another good option, especially for larger projects with thicker yarns. It has a looser weave that accommodates bigger needles.
A gripper frame is vital to keep your fabric tight while working. Without proper tension, your stitches may pull out easily. These frames use rubber strips to grip your fabric without damaging it.
You can choose between traditional wooden frames or plastic snap frames. The important thing is that they hold your fabric drum-tight. Some crafters use embroidery hoops with added tape for grip, but dedicated gripper frames work best.
The Best Yarns and Threads
Choosing the right fiber for your punch needle project depends on your needle size and desired effect. For larger needles, use yarn – preferably 100% wool which holds its shape better than synthetic fibers.
For medium-sized needles, try #8 pearl cotton or Valdani pearl cotton. These threads create beautiful definition and work well for detailed designs.
If you’re using a finer needle, DMC floss is perfect. You can separate the strands to achieve different textures and thicknesses.
Consider color fastness and washability when selecting your materials. Natural fibers often produce the best results, but they may require special care.
Try to buy a bit more yarn than you think you’ll need. Running out mid-project can be frustrating, especially if you can’t find the exact color match later.
Additional Accessories
A few extra tools will make your punch needle experience much smoother. Scissors are essential – both regular fabric scissors and small embroidery scissors for detail work.
A pen or transfer marker helps you trace your design onto fabric. Water-soluble markers are ideal since they disappear after washing.
Consider getting a needle threader if you’re using finer threads. Your eyes will thank you!
A wooden ruler or measuring tape helps with spacing and design layout. Some crafters also use a hoop stand or lap frame to hold their work, reducing hand fatigue.
Storage containers keep your supplies organized and prevent needles from getting lost. A project bag makes it easy to take your punch needle work on the go.
Preparing Your Fabric
Before you start punching, you need to get your fabric ready. Good preparation will help your punch needle project look neat and professional from start to finish.
Transferring the Design
Start by choosing your design. You can draw your own or find patterns online. Use a water-soluble pen or light pencil to trace your design onto the fabric. Make sure the lines are clear but not too thick.
If your design is complex, consider using a lightbox or sunny window to help with tracing. Simply place your design under the fabric and trace over it.
For darker fabrics, try using carbon paper or chalk pencil so your design shows up clearly. Remember that your design will appear reversed on the front side of your project!
It’s helpful to mark the direction you’ll be punching in with arrows. This keeps your stitches consistent and your finished project looking smooth.
Securing Fabric to the Frame
Choose an embroidery hoop or frame that’s slightly larger than your design. The fabric needs to be drum-tight for successful punch needle work.
Start by loosening the screw on your embroidery hoop and separating the inner and outer rings. Place your fabric over the inner ring, then press the outer ring down over it.
Pull the fabric from all sides while tightening the screw. The fabric should feel tight like a drum when you tap it. If it’s loose, your stitches will be uneven.
For larger projects, try a no-slip hoop or add strips of felt inside your hoop to grip the fabric better. This prevents the fabric from slipping as you work, which can ruin your project.
Threading and Using the Punch Needle
Getting your punch needle properly threaded is the foundation for creating beautiful punch needle art. The way you hold and move your tool affects the quality of your stitches and the overall look of your project.
Threading Techniques
To thread your punch needle, start by cutting your yarn at an angle for easier threading. Grab a wire needle threader – this thin tool will be your best friend! Simply insert the wire loop through the hollow needle from the pointed end toward the handle.
Place about 1-2 inches of yarn through the wire loop. Then gently pull the threader back through the needle, bringing the yarn with it. Make sure to pull the yarn all the way through until it comes out near the handle.
Leave a tail of yarn (about 3-4 inches) hanging from the tip of your needle. This tail will be your first few stitches before it gets secured in your fabric.
For medium tip punch needles, thicker yarns work best. If you have trouble threading, try trimming the yarn end again or using a smaller yarn weight.
The Punching Technique
Hold your threaded punch needle like a pencil, with the beveled (slanted) opening facing the direction you’re working. This helps create consistent loops.
Your fabric should be stretched tightly in an embroidery hoop or frame. Loose fabric leads to uneven stitches and frustration!
Insert the needle completely into your fabric until the handle touches the surface. Then lift the needle straight up about 1/8 inch above the fabric – don’t pull it all the way out!
Move forward slightly (about 1/8 inch) for your next stitch and repeat. Keep your stitches close together but not overlapping. This creates a dense, plush texture in your finished piece.
Remember to work in one direction, either toward or away from yourself. Consistency is key for professional-looking results.
Adjusting Loop Height
Most punch needles allow you to adjust the loop height by turning a dial or moving a stopper on the needle shaft. Taller loops create a plusher, shaggier look while shorter loops give a more dense, carpet-like finish.
For beginners, start with a medium loop height of about 1/4 inch. This gives you enough yarn to work with while maintaining control over your stitches.
If your loops seem uneven, check that you’re inserting the needle fully to the handle each time. Inconsistent depth creates inconsistent loop heights.
Different projects benefit from different loop heights. Rugs and functional items work best with shorter, denser loops that won’t catch on things. Wall hangings and decorative pieces can use varied loop heights for visual interest.
Try experimenting with loop heights in the same project to create texture and dimension in your punch needle art!
Creating Textures and Patterns
Punch needle is amazing because you can create so many different textures and patterns in your work. By changing how you use your needle, you can make your designs come alive with dimension and visual interest.
Manipulating Loop Heights
You can create wonderful texture by changing your loop heights. Short loops make a flat, dense area while longer loops create a plush, raised effect. Try setting your needle to different depths for various parts of your design.
When working on a picture or scene, use shorter loops for background elements. Use longer loops for focal points to make them stand out with more relief. This technique helps create depth in your work.
You can even punch from the back of your fabric for a completely different look! This creates flat stitches instead of loops, perfect for fine details in your pattern.
Tip: Practice making a small sample with different loop heights side by side to see how they look together.
Mixing Colors and Textures
Playing with different colors and yarns adds amazing dimension to your punch needle projects. Try using a mix of wool, cotton, and specialty yarns in the same project for visual interest.
Create patterns by alternating colors in rows or sections. You can make stripes, checkerboards, or gradients that add movement to your work.
For realistic pictures, blend similar shades together by alternating them in small areas. This creates a subtle, hand-painted effect that’s perfect for landscapes or portraits.
Fun idea: Try “painting” with your yarn by changing colors frequently within a small area. This creates a beautiful textured effect that looks like brushstrokes!
Remember that different yarn thicknesses also create texture. Mix chunky and fine yarns for even more interesting relief in your finished piece.
Finishing Techniques
Once you’ve completed your punch needle design, it’s time to properly finish your project so it stays intact and looks professional. Proper finishing prevents your loops from pulling out and protects your hard work.
Binding the Edges
Binding the edges of your punch needle project prevents fraying and creates a clean look. You have several options for this important step.
The simplest method is to fold the excess monk’s cloth to the back side and secure it with fabric glue. Make sure to apply the glue evenly along the edges.
You can also use a whip stitch around the edges for a more durable finish. Thread a needle with matching thread and work your way around the perimeter with small, even stitches.
If you’re making a pillow or cushion, you might want to sew your piece to another fabric piece, creating a border that frames your work nicely.
For wall hangings, consider mounting your work on a foam board or stretching it over a wooden frame to give it structure and make it display-ready.
Sealing the Backside
The backside of your punch needle project needs protection to keep your loops secure and prevent them from pulling out.
A fabric adhesive specifically designed for crafts works well. Apply a thin, even layer across the back of your work. This seals the loops in place without making the fabric stiff.
You can also sew a backing fabric to your project. Choose a soft cotton that complements your design. This not only secures your work but also gives it a professional finish.
For decorative items that will be handled often, consider using iron-on interfacing. This adds stability without changing the look or feel of your project.
Don’t forget to trim any loose threads before sealing the back. This small step makes your finished piece look much neater and more professional.
Troubleshooting Common Issues
Even experienced punch needle crafters run into problems sometimes. Most issues have simple fixes once you know what to look for.
Punch Needle Slipping
Is your punch needle sliding out of your hand while you work? Try wrapping a small piece of rubber band or washi tape around the handle for better grip. Some punches come with ergonomic handles, but others can be slippery.
Your needle might also be slipping out of the fabric. This usually happens when you pull the needle up too far between stitches. Keep your needle tip close to the fabric surface as you move to the next punch point.
Another common cause is not pushing the needle all the way down into the fabric. Make sure you’re pressing until the handle touches the fabric with each punch.
Using the wrong fabric can also cause slipping. Monk’s cloth or weaver’s cloth with a tight weave works best for punch needle projects.
Thread Tension Problems
Thread tension is crucial for successful punch needle work. If your loops keep pulling out, you might be pulling your yarn too tight. Try holding your yarn more loosely in your non-dominant hand.
Check that you’re using the right size needle for your yarn. Thicker yarns need larger needle sizes, while embroidery floss works better with smaller needles.
The length of your loops matters too. Adjust your needle depth setting if your loops are uneven. Consistent depth creates uniform loops that stay in place.
If loops still won’t stay, try working in a different direction. Some crafters find that working from left to right or toward your body helps maintain proper tension.
Cleaning and Maintenance
Proper cleaning and care will help your punch needle projects last longer and keep your tools in great shape. Taking a few simple steps can make a big difference in maintaining both your finished work and equipment.
Care for Your Punch Needle
Cleaning your punch needle projects depends on the materials you used. Most projects can be hand washed with mild soap. The loops are actually more stable than you might think, even without glue!
For coasters or items that get regular use, try a gentle kitchen liquid soap. Apply it carefully with minimal agitation to preserve your loops.
When you finish a project, always clean up any tangled loops. Use your needle’s tip or sharp scissors to carefully separate and straighten any loops that got twisted during your work.
Before washing any project, check the care instructions on your yarn label. Different fibers require different cleaning methods.
For wall hangings, a light dusting is usually all you need. If deeper cleaning is necessary, spot clean gently rather than submerging the entire piece.
Maintaining Your Gripper Frame
Your gripper frame needs regular attention to keep it working properly. Brush away loose fibers and lint after each project to prevent buildup.
Check the tension of your frame regularly. If it feels loose, tighten any adjustable parts according to the manufacturer’s instructions.
Store your gripper frame flat in a dry place. Leaning it against a wall might cause it to warp over time.
If your frame has wooden parts, occasionally treat them with a light furniture wax to prevent drying and cracking.
Clean the gripper surface with a soft brush to maintain its grip strength. Avoid using liquids on the gripper areas as this can reduce their effectiveness.
Keep your frame away from direct sunlight when not in use. UV exposure can damage both wood and plastic components over time.
Inspirational Ideas for Projects
Punch needle projects offer endless possibilities for expressing your creativity. Let’s explore some fun and practical ways to use your new punch needle skills in your home and wardrobe.
Home Décor Applications
Rugs and trivets are perfect starter projects for your punch needle adventures. You can create a small rug for your bedside or a set of colorful trivets to protect your table from hot dishes. The dense, plush texture adds warmth to any space.
Wall hangings make stunning statement pieces. Try creating abstract designs, landscapes, or even words and quotes that inspire you. The textured finish catches light beautifully and adds dimension to your walls.
Cushion covers are both practical and decorative. Punch needle designs on pillow fronts can transform ordinary cushions into conversation pieces. You might start with simple geometric patterns before moving to more complex designs.
Seasonal decorations like ornaments, wall hangings, and table centerpieces allow you to refresh your home throughout the year. A pumpkin-shaped punch needle piece for fall or a snowflake for winter adds charm to your seasonal decor.
Fashion and Wearable Art
Bags and purses become unique accessories with punch needle embellishments. A simple tote can become extraordinary with a punch needle design on the front pocket. Summer purses look especially cute with bright, playful patterns.
Patches for clothing allow you to personalize your wardrobe. Create small punch needle designs that can be attached to jean jackets, backpacks, or even baseball caps. These fuzzy embellishments add texture and personality to everyday items.
Jewelry like earrings and brooches offers a way to wear your punch needle art. Small hoops with tiny punch needle designs make for eye-catching earrings that showcase your crafting skills.
Hair accessories such as clips or headbands with small punch needle elements bring a unique handmade touch to your style. These small projects are perfect for using up leftover yarn and practicing new techniques.
Learning Resources and Community
Finding the right resources and connecting with fellow punch needle enthusiasts can make your learning journey more enjoyable. There are many ways to improve your skills and get inspired by others who share your passion.
Recommended Books and Authors
If you’re looking to expand your punch needle knowledge, books are fantastic resources. “Punch Needle: Master the Art of Punch Needling Accessories for You and Your Home” by Arounna Khounnoraj offers beautiful modern patterns and clear instructions.
Juliette Michelet’s “Modern Punch Needle” is perfect for beginners with its step-by-step approach to creating contemporary designs. The book includes 15 starter projects that gradually increase in difficulty.
Look for books with clear photographs, pattern templates, and technique explanations. Many punch needle books include transferable patterns you can use right away, which is helpful when you’re just starting out.
Online Tutorials and Classes
YouTube is packed with free tutorials for punch needle beginners. Channels dedicated to fiber arts often have specific punch needle playlists with everything from threading tips to project ideas.
Michaels craft store offers online classes in punch needle basics, as mentioned in the search results. These classes can guide you through the fundamentals from materials selection to completing your first project.
Platforms like Skillshare and Domestika feature comprehensive punch needle courses taught by experienced artists. These classes typically include downloadable punch needle patterns and material lists to help you get started right away.
Joining Punch Needle Communities
Connect with other punch needle enthusiasts through social media groups. Facebook has several active punch needle communities where members share their work, ask questions, and offer tips.
Instagram is a goldmine for punch needle inspiration. Follow hashtags like #punchneedle and #punchneedlecommunity to discover artists and join conversations. Many creators also share free mini-tutorials in their stories.
Local craft stores sometimes host punch needle meetups or workshops where you can learn in person. These gatherings are great opportunities to see different techniques and tools in action and make friends with similar interests.