

Diving into the world of crochet doesn’t have to be overwhelming! If you’re wondering what supplies you need to start your crochet journey, I’ve got you covered. The two most essential items you’ll need are yarn and a crochet hook, without which you simply can’t crochet.
Beyond these basics, a few simple tools will make your experience much smoother. Stitch markers help keep track of your work, scissors let you cut yarn cleanly, and a tapestry needle helps weave in loose ends. For beginners, I recommend starting with an H or J hook and some affordable yarn to practice your first stitches.
Learning to crochet is an exciting adventure that doesn’t require a huge investment upfront. With just these few supplies, you’ll be ready to learn fundamental techniques like chain stitches and single crochet. Once you get comfortable with the basics, you can explore different yarn types and hook sizes to create all kinds of beautiful projects!
Getting Started with Crochet
Crochet is a fun, relaxing hobby that doesn’t require a lot to get started. You’ll need just a few basic supplies before you can begin creating beautiful handmade items.
Understanding Crochet Basics
Crochet is a craft where you use a hook to pull loops of yarn through other loops, creating connected stitches. Unlike knitting, which uses two needles, crochet only needs one hook at a time. This makes it portable and easy to pick up.
The basic crochet stitches include chain stitch, single crochet, double crochet, and treble crochet. Don’t worry about mastering them all at once! Start with the chain stitch, which forms the foundation of most projects.
Holding your hook correctly is important. There are two main grips – the knife hold (like holding a knife) and the pencil hold (like holding a pencil). Try both to see which feels more comfortable for you.
Choosing Your First Crochet Hook
Crochet hooks come in different sizes, usually marked with letters or numbers. In the US, hooks range from B-1 (2.25mm) to Q (15mm) and beyond.
For beginners, medium-sized hooks (G/6, H/8, or I/9) are best. These sizes are:
- Easy to handle
- Work well with medium-weight yarns
- Allow you to see your stitches clearly
Hook materials matter too! Aluminum hooks are affordable and smooth. Plastic hooks are lightweight and good for beginners. Wooden or bamboo hooks feel warm in your hands and have less slip.
Start with just one or two hooks rather than buying a whole set. You can always add more as you grow your skills.
Selecting the Right Yarn
For your first projects, choose medium weight yarn (also called worsted weight or #4). This yarn is:
- Easy to work with
- Shows stitches clearly
- Available in many colors and textures
Avoid dark colors when you’re learning. Light or bright colors make it easier to see your stitches as you work. Solid colors are also better than variegated (multi-colored) yarns for beginners.
Natural fibers like cotton and wool feel nice but can be pricier. Acrylic yarn is:
- Budget-friendly
- Washable
- Durable for practice
Pick a yarn that feels good in your hands. You’ll be handling it a lot, so the texture should be pleasing to you!

Essential Crochet Tools and Accessories
Getting started with crochet doesn’t require a lot of fancy equipment. You’ll need just a few basic tools to begin creating beautiful projects, from simple granny squares to cute amigurumi.
Must-Have Crochet Hooks
Crochet hooks are the most important tool you’ll need. They come in different sizes, usually labeled with letters (US) or numbers (metric). For beginners, medium-sized hooks (G/6 or H/8) work best with worsted weight yarn.
Hooks are made from various materials including:
- Aluminum – lightweight and smooth
- Plastic – inexpensive and lightweight
- Bamboo – warm to touch and gentle on hands
- Ergonomic – comfortable for longer crochet sessions
Start with just one or two hooks in common sizes. You can always add more as your skills grow and your projects become more diverse.
Yarn is your second essential supply. Choose light-colored, medium-weight yarn when you’re learning. This makes it easier to see your stitches.
Additional Helpful Tools
Several accessories will make your crochet experience much smoother:
Stitch markers help you keep track of important points in your pattern. You can use store-bought ones or improvise with paper clips or yarn scraps.
Scissors are needed for cutting yarn. Small, sharp scissors work best.
Tapestry or darning needles with large eyes help you weave in loose ends. They’re essential for finishing any project neatly.
Stuffing is necessary for amigurumi or stuffed projects. Polyester fiberfill is commonly used.
A measuring tape helps ensure your projects come out the right size.
Don’t forget about safety eyes if you’re making toys or amigurumi creatures!
Yarn: Types and Textures
Choosing the right yarn is one of the most exciting parts of starting a crochet project! The type and texture of yarn you select will greatly impact how your finished piece looks and feels.
Synthetic vs. Natural Yarns
Natural fibers come from plants and animals. Cotton yarns are breathable and perfect for dishcloths, summer tops, and baby items. Wool provides warmth and has some natural stretch, making it great for winter accessories. Other natural options include alpaca, silk, cashmere, and linen.
Synthetic yarns like acrylic are budget-friendly and come in endless colors. They’re washable and durable, making them ideal for beginners and everyday items. Acrylic yarn is also less likely to cause allergic reactions compared to wool.
Many modern yarns blend different fibers. You’ll find wool/acrylic and cotton/acrylic mixes that combine the best qualities of both materials. These blends often give you durability with a nicer feel than pure acrylic.
Yarn Weight and Its Importance
Yarn weight refers to how thick or thin your yarn is. The most common option is medium weight yarn (also called worsted or #4), which works well for most projects and is easy for beginners to handle.
Fingering weight yarns are thin and perfect for delicate projects like shawls and socks. They often contain nylon or silk for added strength.
Chunky yarn and super bulky varieties create thick, cozy projects that work up quickly. These heavier weights are perfect for winter scarves, blankets, and quick projects when you’re short on time.
The yarn weight you choose affects which hook size you’ll need. Heavier yarns require larger hooks, while finer yarns need smaller hooks. Always check the yarn label for recommended hook sizes and gauge information!
Basic Crochet Stitches and Techniques
Learning a few basic stitches will open up a world of crochet possibilities. These fundamental techniques form the building blocks for virtually every crochet project you’ll ever make.
Mastering Fundamental Stitches
To begin crocheting, you’ll need to learn several essential stitches. Start with the slip knot, which is how you attach yarn to your hook. Next, learn the chain stitch (ch) – this creates your foundation row and is often written as “ch” in patterns.
The single crochet (sc) is usually the first actual stitch beginners learn. It’s short, sturdy, and perfect for items that need structure.
Double crochet (dc) is taller than single crochet and works up quickly. Half double crochet (hdc) falls between these two in height.
Triple crochet (tr) creates an even taller stitch that’s great for lacy designs.
Don’t forget the slip stitch (sl st), which helps you join rounds or move across your work without adding height.
Practice holding your hook comfortably – either like a pencil or knife – whatever feels natural to you.
Combining Stitches to Create Patterns
Once you’ve mastered basic stitches, you can combine them to create endless patterns. Try alternating single and double crochets in the same row for interesting texture.
Working stitches in the front or back loops only creates ridges and unique designs. This technique is often used in ribbing for hats and sweaters.
Simple patterns might include:
- Shell stitch: multiple double crochets worked into one stitch
- V-stitch: two double crochets with a chain space between them
- Cluster stitch: multiple stitches worked together
You can create beautiful texture by varying where you insert your hook. Try working in the spaces between stitches rather than in the stitches themselves.
Remember that practice makes perfect! Start with small projects like dishcloths to build confidence with your new skills.
Reading Crochet Patterns
Learning to read crochet patterns is like learning a new language, but don’t worry! Once you understand the basics, you’ll be able to create beautiful crochet projects from written instructions.
Deciphering Pattern Abbreviations
Crochet patterns use lots of abbreviations to save space. Common ones include:
- SC = single crochet
- DC = double crochet
- CH = chain
- ST = stitch
- SL ST = slip stitch
- BLO = back loop only
Most patterns include a key at the beginning that explains all the abbreviations used. If you’re confused, look for this section first! Keep a cheat sheet nearby when you’re starting out.
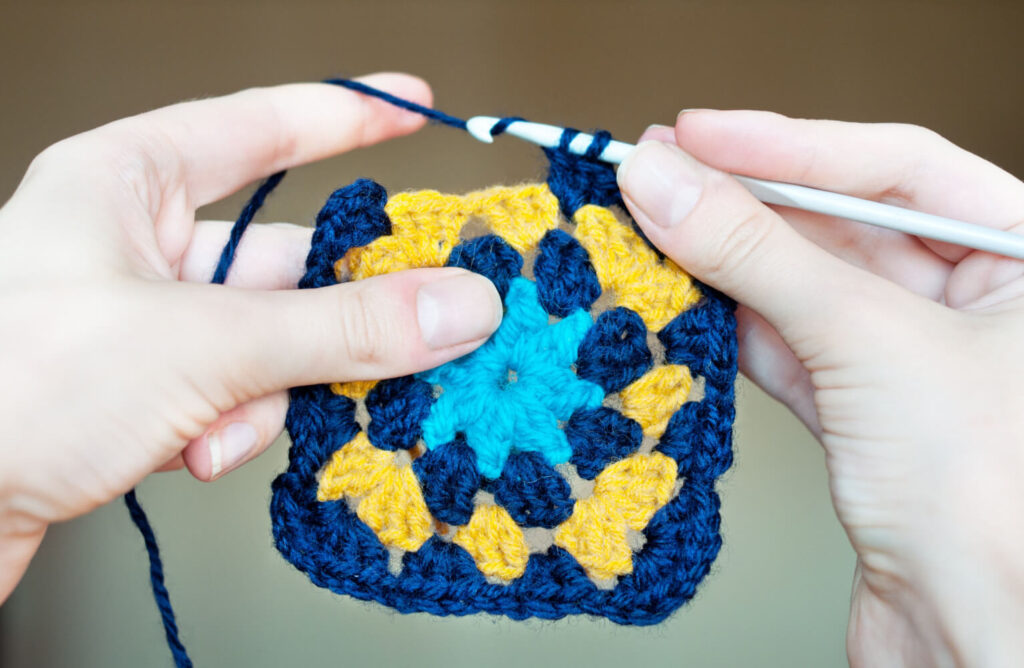
Symbols are another way patterns can be written. These visual diagrams show what stitches to make and where. Many crocheters find them easier to follow, especially for granny squares and complex projects.
Understanding Pattern Instructions
Patterns use special formatting to show repeated actions. You’ll often see:
Asterisks (*) – Repeat everything after the asterisk the number of times indicated.
Example: “SC 2, DC 1 repeat 3 times” means you’ll do SC 2, DC 1 three times in a row.
Parentheses () and brackets [] – Show groups of stitches to be worked together or repeated.
Numbers before stitches tell you how many to make. “3 SC” means make 3 single crochet stitches.
Round and row numbers help you keep track of where you are in your project. Reading patterns gets easier with practice! Try starting with beginner patterns labeled “easy” before tackling complex crochet projects.
Starting Your Crochet Project
Once you have your crochet supplies ready, it’s time to begin your first project. Planning your workspace and choosing the right project will help make your crochet experience enjoyable and successful.
Project Planning and Design
Start by choosing a simple project for your first attempt. Scarves, dishcloths, and small squares are perfect for beginners. They give you plenty of practice with basic stitches like chains and single crochets without overwhelming you.
Look for patterns labeled “beginner” or “easy” to ensure you’re not taking on too much too soon. Most beginner projects use just one or two basic stitches, which helps you build confidence.
Before you begin, take time to read through the entire pattern. Make sure you understand the abbreviations and terms. Many patterns include a key that explains these terms.
Consider practicing your stitches on a small swatch before starting your actual project. This gives you a chance to get comfortable with the yarn and hook.
Setting Up Your Crochet Workspace
Create a comfortable space with good lighting. Your eyes will thank you, especially when working with darker yarns! A lamp that shines directly on your work is ideal.
Find a comfortable chair that supports your back. Crochet sessions can last for hours, so your comfort matters.
Keep these items within arm’s reach:
- Your pattern (printed or on a device)
- Extra yarn
- Scissors
- Stitch markers
- A small notebook for tracking rows
Consider using a project bag or basket to keep everything organized. This makes it easy to pick up your project whenever you have spare time.
Take regular breaks to stretch your hands and wrists. Crochet should be enjoyable, not painful!
Troubleshooting Common Crochet Issues
Even experienced crocheters make mistakes! Learning how to fix common issues will save you time and frustration as you work on your projects.
Fixing Mistakes and Dropped Stitches
When you notice a mistake in your crochet work, don’t panic! The sooner you catch it, the easier it is to fix. If you’ve made an error in the previous row, simply use your hook to pull out the stitches (called “frogging”) until you reach the mistake.
For a single wrong stitch, you can use a crochet hook to undo just that stitch without unraveling the whole row. Stitch markers are super helpful here – place them every 10-20 stitches to make it easier to spot where problems might be.
If you’ve accidentally dropped a stitch, causing your work to get narrower, you can add a stitch by working two stitches into one space. For projects getting mysteriously wider, you might be accidentally adding stitches at the end of rows.
Always count your stitches at the end of each row to catch mistakes early!
Managing Yarn Tension
Tension problems can make your crochet work look uneven. If your stitches are too tight, your project will feel stiff and might curl up. Too loose, and your work will have holes and look sloppy.
Try these tips for better tension:
- Hold your yarn looser if stitches are tight
- Practice a consistent grip on your yarn
- Use a larger hook for naturally tight crocheters
- Try yarn guides or tension rings if you struggle with consistency
Your wrist position matters too! Keep it relaxed while crocheting to prevent both tension issues and hand strain. If your hand starts to cramp, take a break and stretch.
Different yarn weights need different tension approaches. Lighter yarns often need firmer tension, while bulky yarns work better with a looser hold. Experiment to find what feels right with each new project!
Finishing Techniques
Once you’ve completed your crochet project, it’s time to give it that professional touch. Proper finishing makes the difference between a homemade-looking item and a beautifully crafted piece.
Weaving in Ends
Weaving in ends is essential for a clean, professional finish. Start by threading your yarn tail onto a tapestry needle. Weave the end back and forth through your stitches, going in different directions to secure it well.
Try to weave through at least 3-4 inches of your work. This prevents the ends from poking out or unraveling when your project is used or washed.
For extra security, you can weave in a zigzag pattern or split your yarn plies and weave them separately. Be careful not to pull too tight, as this can distort your stitches.
When working with different colors, weave each color into stitches of the same color when possible. This helps hide them better!
Blocking and Shaping Your Work
Blocking is like magic for your crochet projects! It evens out stitches and gives your work its intended shape and dimensions.
To block, you’ll need:
- Pins
- Blocking mats or towels
- Spray bottle or basin for water
Start by wetting your project—either spray it until damp or soak it completely and gently squeeze out excess water. Don’t wring it!
Pin your project to your blocking surface in the desired shape, stretching gently to open up lace patterns or straighten edges. Use plenty of pins along edges for even tension.
Let your project dry completely before removing the pins. This can take 24-48 hours depending on your yarn type and project size.
Caring for Your Crochet Items
Your handmade crochet projects deserve proper care to maintain their beauty and extend their lifespan. With a few simple habits, you can keep your creations looking fresh and beautiful for years to come.
Washing and Maintenance Tips
Wash your crochet items as infrequently as possible to help them last longer. Many fibers, especially wool, naturally resist stains and don’t need frequent cleaning.
For acrylic yarn projects, machine washing on a gentle cycle with mild detergent works well. Use cold water to prevent shrinking or stretching. Place delicate items in a mesh laundry bag for extra protection.
Natural fiber projects often need hand washing. Fill a basin with lukewarm water and gentle soap, then submerge your item. Avoid twisting or wringing, which can damage the fibers. Instead, gently squeeze out excess water and reshape while damp.
Never iron crochet directly! If needed, use the lowest steam setting and hover above the fabric without touching it.
Storing Crochet Projects
Store your crochet items folded rather than hanging to prevent stretching. This is especially important for heavier items like sweaters and blankets.
Keep projects in a cool, dry place away from direct sunlight, which can fade colors over time. Plastic bins with lids offer good protection, but ensure items are completely dry before storing to prevent mildew.
For seasonal items, clean them before storage and place acid-free tissue paper between folds to maintain shape. Consider adding lavender sachets or cedar blocks as natural moth repellents.
For amigurumi or stuffed projects, store in dust-free containers and occasionally fluff them to maintain their shape.