
Quick Answer
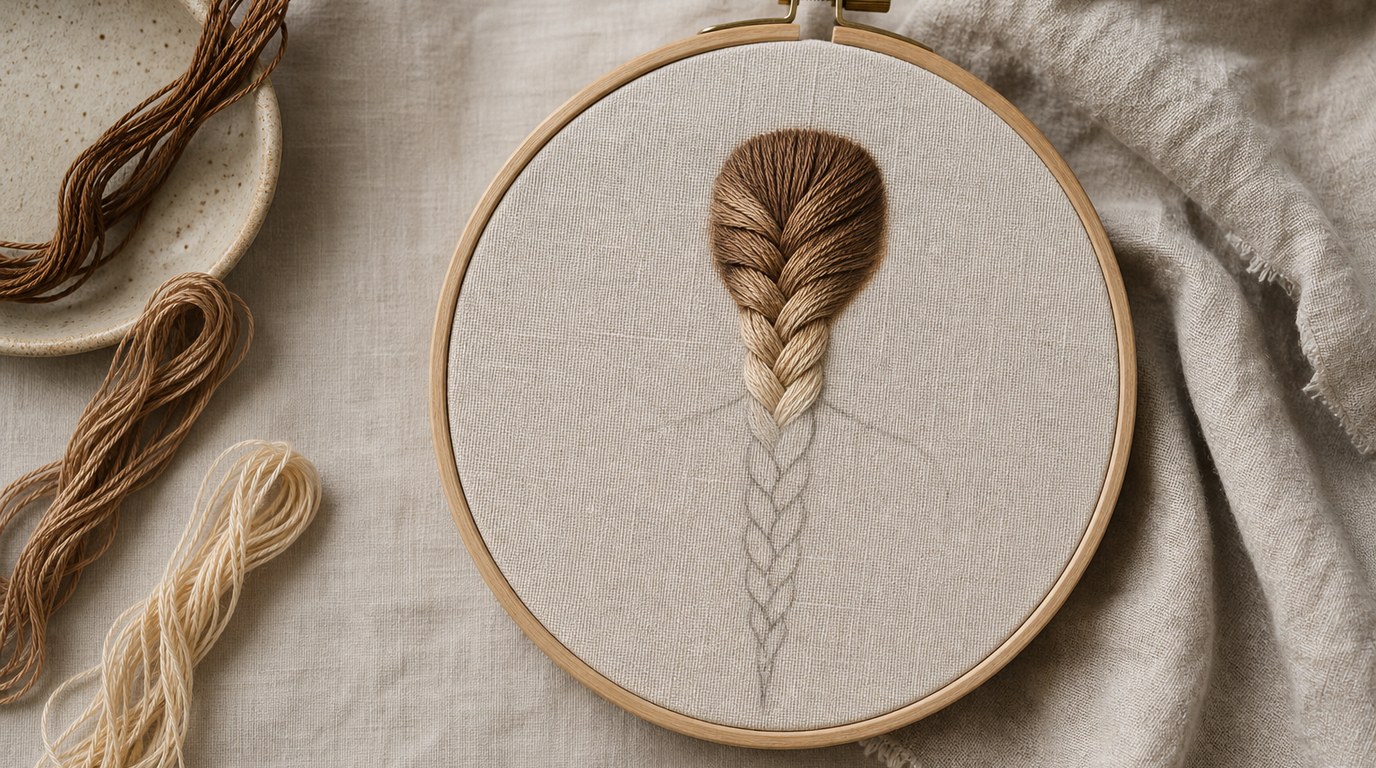
To embroider a French braid hairstyle, build the braid as a series of overlapping, angled hair sections that meet down the center of the head. The main takeaway: do not try to stitch one long plaited line. Instead, sketch the braid as stacked “V” or leaf-shaped segments, then fill each segment with directional stitches so the hair appears woven.
This technique works especially well for embroidered portraits, hoop art, fashion illustrations, dolls, and decorative textile pieces where the hairstyle needs to look modern but still handmade. A French braid is recognizable because the hair seems to gather from both sides of the head into a central braid. In embroidery, that effect comes from three choices: a tapered braid shape, alternating stitch direction, and subtle changes in thread tone.
A simple version uses back stitch for the braid outline and satin stitch or long-and-short stitch for each overlapping section. A more textured version uses split stitch, stem stitch, or couching to create strand-like hair. For a beginner, the easiest path is to draw the braid first, stitch the outer hair flow toward the center, then work the braid sections from top to bottom.
Use fewer strands of floss than you think you need. Two strands usually give enough coverage without making the braid bulky. For tiny portraits, one strand is better. The finished result should look like soft hair crossing over itself, not a rope sitting on top of the fabric.
If your goal is “french braid learn this modern embroidery hairstyle,” focus on the structure first: center spine, alternating sections, side hair feeding inward, and a tapered end. Once that shape is clear, your stitch choice becomes much easier.
How to Think About This Topic
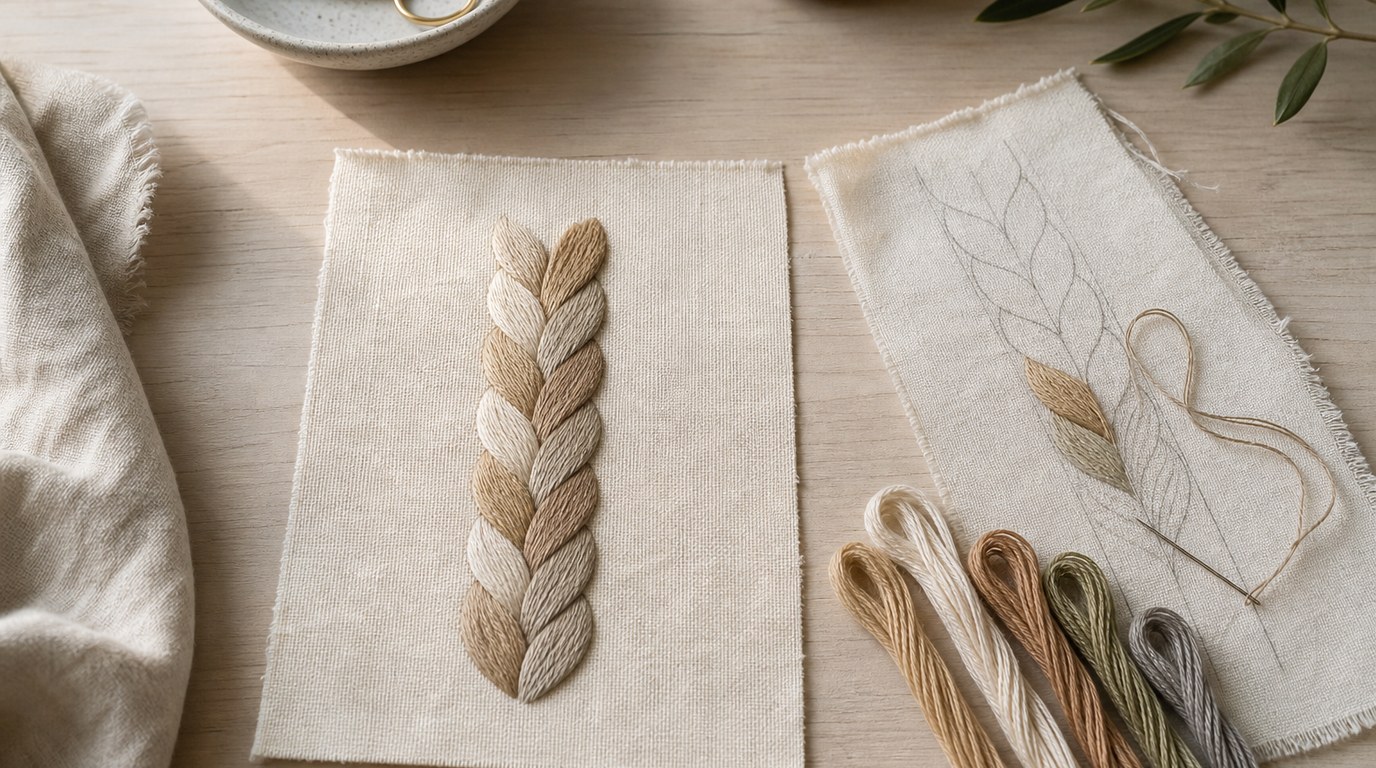
A French braid in embroidery is not a literal copy of every hair strand. It is an illusion built from repeated shapes. The easiest mental model is to think of the braid as a stack of overlapping petals. Each petal points diagonally toward the center, and the next petal overlaps it from the opposite side. When these shapes repeat down the head, the viewer reads them as a woven braid.
Start with the head shape or hairstyle silhouette. If you are stitching a portrait from the back, lightly mark the crown, nape, and center line. The center line is not always visible in the finished work, but it helps you place each braid segment evenly. The braid should be widest near the upper back of the head and narrower as it moves toward the nape or ponytail end.
Next, separate the hairstyle into three zones. The first zone is the loose hair at the sides of the head. These stitches should travel inward, because a French braid pulls hair from both sides toward the center. The second zone is the braid body, where the overlapping sections create the woven effect. The third zone is the tail or finishing point, which may be a short plait, a ribbon, a bun, or loose hair.
Direction matters more than stitch complexity. If all your stitches run vertically, the hairstyle will look flat. If the left-side sections lean down and right, while the right-side sections lean down and left, the braid starts to look woven. This is why even simple stitches can make a convincing braid when placed carefully.
Thread color also supports the illusion. You can stitch the whole braid in one shade, but two or three related tones make the hair more natural. Use the darkest shade in the small shadow gaps where sections overlap. Use the middle shade for most of the hair. Add the lightest shade only on the raised centers or outer curves of the braid. For black or dark brown hair, avoid using pure black for every stitch; deep brown, charcoal, or navy-black gives more dimension.
Scale controls the amount of detail. On a small hoop portrait, each braid section may be only a few stitches wide. On a larger textile piece, you can add individual strand lines inside each section. The goal is not to fill every space with thread, but to make the viewer understand the hairstyle immediately.
Fabric choice affects how clean the braid looks. A tightly woven cotton, linen, or evenweave gives better control than loose fabric. If you are working on clothing or a tote, stabilize the fabric first so the braid does not distort as you stitch. Hair embroidery often involves many directional stitches packed into a small area, and unstable fabric can pucker.
Think of this technique as drawing with thread in layers. First comes the guide drawing. Then the side hair flow. Then the braid sections. Then the shadow lines and highlights. Working in that order keeps the hairstyle readable and prevents the braid from becoming a tangled patch of stitches.
Practical Guidance
Begin by transferring a clean braid outline to your fabric. Use a removable fabric pen, light pencil, or transfer method suited to your cloth. Draw the head or hair mass first, then mark a soft center line down the braid. Add alternating curved sections from left and right, like nested leaves. Keep the top sections wider and the lower sections smaller. If the braid will end in a ponytail, draw a tie and a small tail of loose hair.
Choose your stitch style based on the effect you want:
| Braid effect | Best stitch choice | Skill level | Use it when |
|---|---|---|---|
| — | — | —: | — |
| Clean illustrated braid | Back stitch outline plus satin fill | Beginner | You want a graphic, neat hairstyle |
| Soft realistic hair | Long-and-short stitch | Intermediate | You want blended strands and highlights |
| Textured strand lines | Split stitch or stem stitch | Beginner to intermediate | You want visible hair direction |
| Raised decorative braid | Couching or padded satin stitch | Intermediate | You want the braid to stand out |
| Tiny portrait detail | One-strand back stitch | Beginner | The braid is very small |
For a simple modern braid, thread your needle with two strands of embroidery floss. Stitch the side hair first. On the left side of the head, make stitches that angle inward toward the braid. On the right side, angle stitches inward from the opposite direction. These stitches do not need to be identical; slight variation makes the hair feel natural. Keep the stitches smooth and avoid pulling too tightly.
Now work the braid body from the top down. Start with the first left-leaning section. Fill it with satin stitch or long-and-short stitch, following the curve of the section. Then stitch the matching right-leaning section beneath it. Alternate left and right as you move down the braid. Let each new section slightly overlap the previous one, or place a darker line between them to create the look of one strand passing over another.
If you are using satin stitch, keep each section small enough that the stitches do not snag. Long satin stitches across a wide braid can become loose over time. For larger braids, use long-and-short stitch instead. It gives the same filled look but breaks the area into safer, more flexible stitches.
Add shadow after the main braid is filled. With a darker shade, stitch short lines in the crease where one section crosses under another. These shadow marks should be small; too many dark lines can make the braid look striped. Place shadows mostly near the center of the braid and under the overlapping edges.
Add highlights last. Use one strand of a lighter shade and stitch a few fine lines along the raised curve of selected sections. Do not highlight every segment in the same way. Natural hair catches light unevenly, so a few well-placed highlights are more convincing than constant bright lines.
For blonde hair, combine cream, honey, and light brown. For auburn hair, use copper, chestnut, and dark reddish brown. For gray hair, use silver, warm gray, and charcoal. For fantasy or fashion embroidery, the same method works with pink, blue, green, or purple; just keep a light, middle, and dark value so the braid has depth.
Common problems are usually structural. If the braid looks like a ladder, your sections may be too straight and evenly spaced. Curve them more and vary their length slightly. If it looks like a rope, the sections may be too round; flatten them into overlapping leaf shapes. If the braid disappears into the side hair, increase contrast with darker crease stitches. If the fabric puckers, loosen your tension and use fewer strands.
Before finishing, step back from the hoop. A braid often looks better from viewing distance than it does close up. Check whether the eye can follow the woven path from crown to nape. If yes, stop before overworking it. Hair embroidery can quickly become heavy when too many corrective stitches are added.
To vary the design, change the placement rather than the core method. A side French braid curves diagonally across the head. A double French braid uses two narrow center lines, one on each side. A loose romantic braid has wider, softer sections and more flyaway stitches. A sleek modern braid has cleaner edges, fewer loose strands, and stronger shine lines. In every version, the same rule applies: side hair feeds inward, braid sections alternate, and stitch direction creates the woven look.
FAQ
What Should a Beginner Know First About French Braid Learn This Modern Embroidery Hairstyle?
A beginner should know that the braid is built from repeated angled sections, not one continuous line. Draw the structure first, then stitch each section in alternating directions. Use two strands or fewer, keep your tension gentle, and focus on the woven shape before adding details.
What Matters Most When Evaluating French Braid Learn This Modern Embroidery Hairstyle?
The most important factors are shape, direction, and contrast. The braid should taper naturally, the stitches should angle toward the center, and the overlap points should have subtle shadows. If those three elements are clear, the hairstyle will read as a French braid.
What Mistakes Should Readers Avoid with French Braid Learn This Modern Embroidery Hairstyle?
Avoid making every braid section identical, pulling the thread too tight, or filling the hair with stitches that all run the same direction. Also avoid using too many strands of floss. Heavy thread can make the braid bulky and reduce the soft hair effect.
What Is the Next Logical Step After Learning About French Braid Learn This Modern Embroidery Hairstyle?
The next step is to practice on a small sample before adding the braid to a finished portrait or hoop. Stitch three or four braid sections, test your thread colors, and adjust the angle of the stitches. Then transfer the method to your final design.