
Quick answer: To frame cross stitch in an embroidery hoop, wash and press the finished piece if needed, center the design in a clean hoop, tighten the screw while gently pulling the fabric smooth, trim the excess fabric at the back, then either gather, glue, or cover the backing for a neat finish. The key is to keep the stitches centered and the fabric taut without stretching the design out of shape.
Hoop framing is one of the simplest ways to display a finished cross stitch because the hoop acts as both the frame and the hanging point. It works especially well for small and medium designs with enough blank fabric around the stitching to wrap securely around the back. The most important rule: do not cut your fabric until the design is fully centered, tightened, and checked from the front.
The Simple Hoop-Framing Method At A Glance
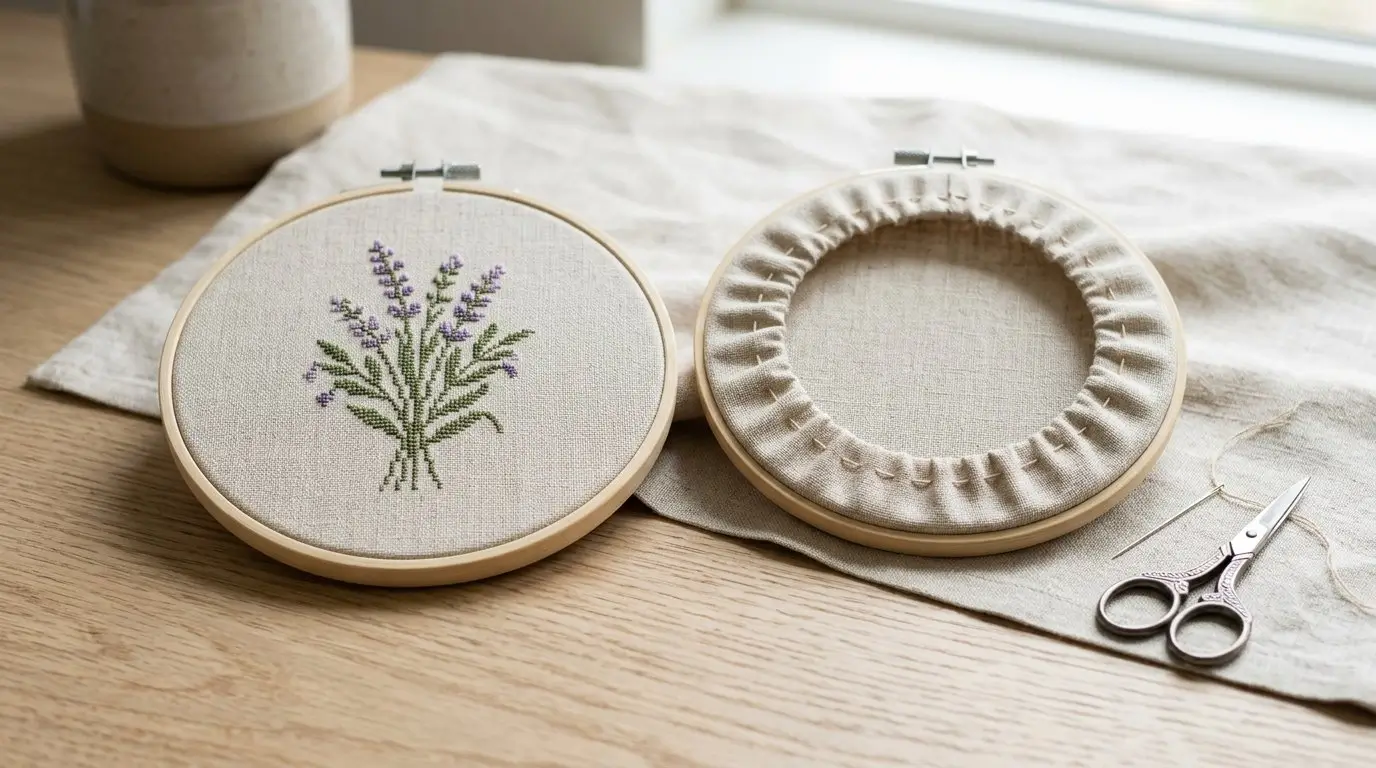
An embroidery hoop can be more than a stitching tool. With a little finishing, it becomes a lightweight display frame for your completed cross stitch. The basic process is straightforward:
- Prepare the fabric by checking for lint, loose threads, creases, and hoop marks.
- Place the design in the hoop with the stitched side facing up.
- Center and tighten the fabric slowly, keeping the rows straight.
- Trim the excess fabric at the back once you are happy with the placement.
- Finish the back by gathering the fabric, gluing it carefully, or covering it with felt or backing fabric.
For beginners, the easiest neat finish is usually a gathered back. You sew a running stitch around the excess fabric, pull it snug toward the center, knot it, and optionally cover it with a felt circle. This keeps the back tidy without needing advanced tools.
Before you begin, make sure your design has enough blank fabric around it. If the stitching sits too close to the hoop edge, it can be difficult to center the design or hide the fabric neatly at the back. Always test the hoop placement first, and only trim after everything looks smooth and straight.
Materials You’ll Need Before You Start
Gather your tools before placing the fabric in the hoop. Once the design is centered, you do not want to pause and risk shifting it while looking for scissors or thread.
Essential materials:
- Finished cross stitch project
- Embroidery hoop
- Small sharp scissors
- Hand sewing needle
- Sewing thread
- Pencil or fabric marker
- Optional felt or backing fabric
Helpful optional supplies:
- Lint roller or clean tape for removing dust
- Iron and pressing cloth
- Clean towel for pressing
- Acid-free backing board, if you prefer a firmer back
- Craft glue or fabric glue
- Ribbon or twine for hanging
- Pins or clips to hold backing fabric in place
Choose a hoop that suits the finished design. A wooden hoop gives a classic, natural look and can be stained, painted, or left plain. A plastic hoop can add color and is often easy to wipe clean. In either case, the hoop should be slightly larger than the stitched design so there is visible blank fabric around the motif.
Check the hoop before using it as a frame. The inner and outer rings should be clean, smooth, and free from splinters or rough edges that could catch the fabric. Tighten and loosen the screw a few times to make sure it works properly.
You also need enough fabric margin. Ideally, the fabric should extend beyond the hoop far enough to wrap around the inner ring and be secured at the back. If the margin is very narrow, choose a smaller hoop only if it does not crowd the stitching.
Prepare Your Cross Stitch For Framing
Preparation makes a big difference because hoop framing leaves the fabric visible and pulled taut. Any creases, dust, pet hair, or uneven tension can be more noticeable once the piece is displayed.
Start by checking the front and back of the project. Look for:
- Loose thread tails
- Stray floss fibers
- Pet hair or lint
- Dust from storage
- Hoop marks from stitching
- Uneven or frayed fabric edges
- Areas where the stitches look pulled or puckered
If the project needs washing, only do so if it is suitable for your fabric and threads. Some floss, hand-dyed threads, specialty fibers, or dyed fabrics may need extra care. Follow the care guidance for the materials you used, and avoid harsh treatment. If you are unsure, test cautiously or skip washing and focus on gentle lint removal.
If pressing is needed, press from the back rather than ironing directly over the front of the stitches. Place the cross stitch face down on a clean towel so the stitches have cushioning. Use a pressing cloth between the iron and fabric, and press gently rather than dragging the iron back and forth. The goal is to smooth the fabric, not flatten the stitches aggressively.
Before tightening the hoop, test the layout. Place the outer hoop over the design like a frame and check the spacing around the stitched area. If the design is directional, decide where the top should be. Many stitchers align the top of the design with the hoop screw because the screw can act as the hanging point. If you plan to add ribbon, you may still want the screw at the top for balance.
Take a moment here. A careful layout check prevents most framing problems later.
Step-By-Step: Frame The Cross Stitch In The Hoop
Follow these steps in order, and keep checking the front before making permanent cuts.
1. Separate the hoop pieces
Loosen the screw at the top of the embroidery hoop until the outer ring can slide off the inner ring easily. Set the outer ring aside and place the inner ring on a clean, flat surface.
Do not loosen the screw so much that it falls out unless you need to clean or adjust the hoop.
2. Lay the fabric over the inner hoop
Place your cross stitch fabric over the inner hoop with the design facing up. The stitched design should sit roughly in the center of the ring.
Smooth the fabric lightly with your hands. Do not pull hard yet; at this stage, you are just getting the placement close.
3. Add the outer hoop
Position the outer hoop over the fabric and inner hoop. Press it down evenly, working around the ring so the fabric does not bunch or fold.
If the outer ring feels too tight to fit over the fabric, loosen the screw a little more. Forcing the hoop down can shift the design or create creases.
4. Center the design before fully tightening
Before tightening the screw, look at the front of the hoop. Check whether the design is centered from side to side and top to bottom. Use the cross stitch fabric grid as a guide: rows and columns should look straight, not slanted.
Gently nudge the fabric as needed. If you want the screw to be the top hanging point, make sure the design is upright in relation to the screw.
5. Tighten gradually and smooth the fabric
Begin tightening the screw a little at a time. As you tighten, gently pull the fabric edges from the back to remove slack. Work around the hoop rather than pulling from one side only.
The fabric should become smooth and taut, but not stretched out of shape. Avoid pulling so hard that the cross stitch grid distorts, the stitches look strained, or the motif becomes misshapen.
6. Check the front carefully
Before trimming anything, inspect the front in good light. Look for:
- A centered design
- Straight fabric rows
- Even tension
- No wrinkles near the hoop edge
- No puckering around stitched areas
- No trapped lint or loose threads
If something looks off, loosen the hoop slightly and adjust the fabric now. This is much easier before the back is trimmed or finished.
7. Trim the excess fabric
Once the design is centered and the fabric is evenly tightened, turn the hoop over. Trim the excess fabric at the back, leaving enough margin for your chosen finishing method.
For a gathered back, leave a generous fabric edge so you can sew around it and pull it inward. For a glued back, leave enough to fold or secure neatly against the hoop. For a felt-covered back, leave enough fabric to gather or flatten underneath the felt without bulky lumps.
Result check
The front should look smooth, centered, and wrinkle-free. The stitched design should not be pulled crooked, and there should be no puckering near the hoop edge. If the front passes this check, you are ready to finish the back.
Choose A Neat Way To Finish The Back
The back of a hoop-framed cross stitch can be finished in several ways. Your choice depends on whether you want something quick, removable, or polished enough for gifting.
| Back-finishing method | Difficulty | Best use | Main caution |
|---|---|---|---|
| Gathered back | Easy | Simple home display or beginner finishing | Leave enough fabric to sew and pull snugly |
| Glued back | Easy to medium | Fast permanent finish | Glue makes repositioning difficult and should not seep to the front |
| Felt-covered back | Medium | Gift-ready or extra tidy display | Cut the felt neatly so it does not show from the front |
Gathered back
A gathered back is beginner-friendly and does not require glue. Thread a needle with sewing thread and sew a running stitch around the trimmed fabric edge at the back of the hoop. Keep the stitches reasonably even.
When you have sewn all the way around, gently pull the thread so the fabric gathers toward the center. Pull it snug, but do not yank so hard that the front tension changes. Knot the thread securely. You can leave the back as is or cover it with felt for a cleaner finish.
Glued back
For a glued finish, trim the fabric evenly at the back and secure it to the inner hoop or back edge with small amounts of craft glue or fabric glue. Use glue sparingly and keep it away from the stitched front.
Only glue once you are completely happy with the placement. Glue can make future repositioning difficult, and too much can soak into the fabric. Apply a little at a time and press the fabric into place neatly.
Felt-covered back
A felt-covered back gives the cleanest finished look, especially for gifts. Place the hoop on a piece of felt and trace around it. Cut the felt circle slightly smaller than the hoop outline so it fits neatly on the back without showing from the front.
You can stitch the felt to the gathered fabric or glue it carefully around the back edge. Backing fabric can also work if you prefer a patterned finish. Keep the backing smooth so it does not create bumps that affect how the hoop hangs.
Common Mistakes, Troubleshooting, And Display Tips
The most common hoop-framing problems are easy to avoid if you work slowly and check the front often.
Mistake: trimming too early
Do not trim the fabric before the design is centered and tightened. If you cut first and then discover the design is crooked, you may not have enough margin left to adjust it properly.
Mistake: using a hoop that is too small
A hoop that barely fits around the stitching can hide the edges of the design or leave too little fabric for finishing the back. Choose a hoop with enough space around the motif so the design can breathe.
Mistake: over-tightening
Taut fabric looks neat, but over-tightening can warp the fabric grid or strain the stitches. Tighten gradually and stop when the fabric is smooth, not stretched.
Troubleshooting wrinkles
If you see wrinkles near the edge, loosen the hoop slightly. Smooth the fabric from the front and gently pull the slack from the back. Tighten again in small turns, checking as you go.
Troubleshooting an off-center design
If the design looks off-center, reset it before trimming or backing. Loosen the screw, shift the fabric, and check the spacing again. Once the back is glued or covered, adjustments are harder.
Troubleshooting lint or dust
Remove visible lint, dust, or pet hair before sealing the back. A lint roller, clean tape, or careful brushing can help, depending on the fabric and threads.
For display, you can hang the hoop directly from the screw, tie ribbon or twine through the top, or lean the hoop on a shelf. When possible, avoid damp spots and long exposure to harsh direct sunlight, as moisture and strong light can affect many fabrics and threads over time.
Final result check: the front is smooth, the design is centered, the hoop is secure, the back is tidy, and the hanging point is aligned with the top of the design.
FAQ
Do I need to wash cross stitch before framing it in a hoop?
Not always. Wash only if your fabric and threads are suitable for washing and the piece needs it. If you used specialty fibers, hand-dyed floss, or dyed fabric, follow the material care guidance and avoid harsh cleaning.
How much extra fabric should I leave around the design?
Leave enough fabric to wrap around the inner hoop and secure at the back. For most hoop finishes, a generous border is easier to gather, glue, or cover than a narrow edge.
Can I frame cross stitch in the same hoop I stitched it in?
Yes, if the hoop is clean, smooth, and the right size for display. Check for marks, rough edges, or stains first. If the working hoop is worn, use a fresh hoop for framing.
Should I glue the fabric to the embroidery hoop?
You can, but only after the design is centered and tightened. Use glue sparingly and keep it on the back edge so it does not seep through. A gathered back is easier to adjust later.
How do I stop the cross stitch from looking crooked in the hoop?
Use the fabric grid as a guide before tightening fully. Align the design with the hoop screw if it marks the top, tighten gradually, and check the front before trimming or finishing the back.